Connecting WhatsApp, step by step
From an empty Meta account to a message landing in the inbox. Five values you copy and two you paste.
Connect your WhatsApp number and start taking messages in the inbox. It is the one part of Wrap that happens outside Wrap: almost all of it takes place in Meta's own tools, spread across three different consoles that do not always use the same name for the same thing.
Follow this page from end to end. It takes about twenty minutes the first time.
The Meta screens here are illustrations, not screenshots. Meta changes its interface often; what does not change is which value you are after and what it is called. If your screen looks different but the field is named something close, that is the one.
The route, in one picture
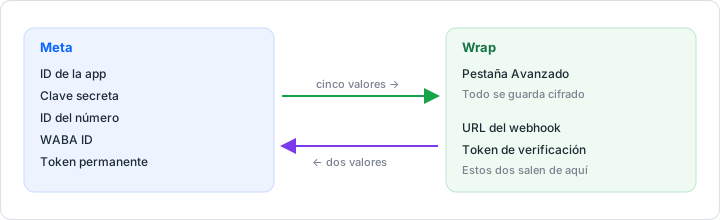
You copy five values from Meta into Wrap, and send two back towards Meta: the webhook URL and the verify token you invent. Everything else is navigation. With that clear, the rest is finding each screen.
Before you start
Gather this first:
- A Meta Business account (business.facebook.com).
- A phone number that is not in use by the normal WhatsApp app or by WhatsApp Business. If the number already has WhatsApp, that account has to be deleted first, and deleting it deletes its history.
- Admin rights on the business in Meta.
1. Create the app
In Meta's developer dashboard, hit Create app and pick the WhatsApp use case. The name is internal: nobody outside your team sees it.
That leaves you on the app's dashboard, which is where most of the rest lives.
2. Copy the app id and secret
Open Settings → Basic.
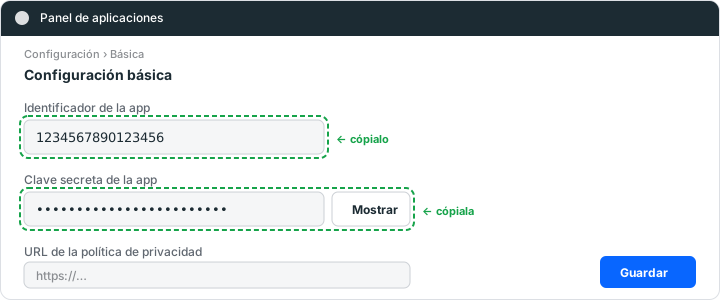
- Copy the app ID, which is shown directly.
- Reveal the app secret, which Meta keeps masked, and copy that too.
Both go into Wrap. The secret is optional, and supplying it lets Wrap verify the signature on every webhook, so it is worth doing.
3. Copy the WABA id and the phone number id
Open the business settings, under WhatsApp accounts: these two are not in the app dashboard.
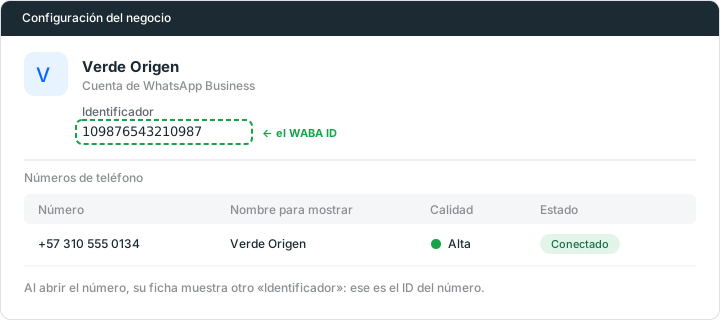
Copy the identifier shown next to the account name: that is the WABA ID.
Now open the number inside that account:
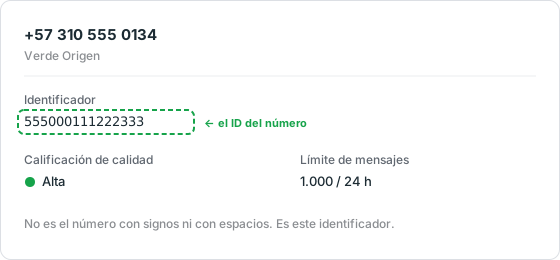
That second identifier is the phone number ID, and it is the one people get wrong most often. It is not the phone number. Not the number without spaces, and not the number with a country code. It is a string of digits Meta invents to refer to that number, and it is what Wrap needs to send.
4. Generate the permanent token
Generate the token of a system user. The one the app dashboard offers you at first lasts 24 hours: good for a test, no good for running a business, because the next day sends start failing with nothing having changed.
Create it over in the business settings:
- System users → Add. Give it a name and the admin role.
- Add assets: assign it the WhatsApp account with full control.
- Generate token, choosing your app.
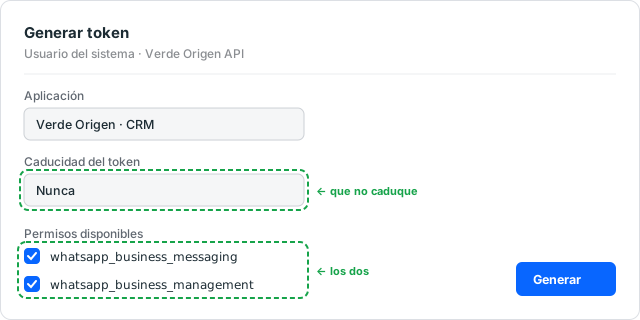
Get two things right on that screen:
- Expiry: never. Choose 60 days and it falls over in 60 days.
- Both WhatsApp permissions:
whatsapp_business_messagingto send and receive,whatsapp_business_managementto manage templates.
Meta shows the token once. Lose it and generate another.
5. Paste it all into Wrap
In Wrap, open Settings → Channels → Add channel → WhatsApp and paste the five values there. Add a sixth you invent yourself: the verify token, any string Meta and Wrap compare to know the webhook is genuine. Wrap stores all of it encrypted.
Save before moving on.
6. Now backwards: configure the webhook
Paste two things into Meta's webhook configuration for the app. Up to here you copied from Meta into Wrap; this step runs the other way.
The callback URL is your Wrap address plus /api/inbound/whatsapp (say,
https://wrap.yourcompany.com/api/inbound/whatsapp). The verify token is
exactly what you just typed into Wrap, with not one space extra.
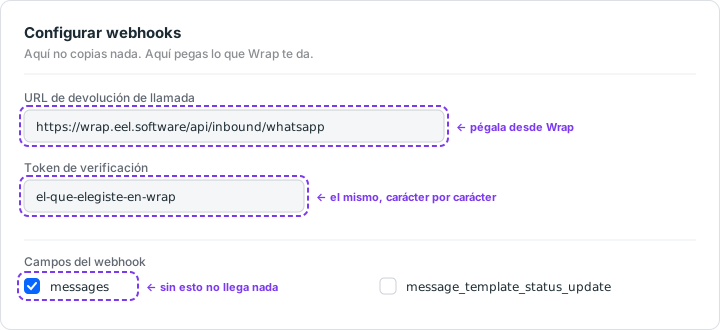
And the step everyone forgets: subscribe to the messages field. Without
that subscription Meta accepts the webhook, reports that everything is fine and
delivers not one message. It is the most common failure in this setup, and it
raises no error at all.
7. Check that something arrives
Message the number from another phone. It shows up in the inbox within a few seconds.
If the message does not arrive, check these four causes:
| Symptom | Likely cause |
|---|---|
| Nothing arrives, and Meta reports no error | The messages subscription is missing |
| Meta rejects the webhook when you save it | The verify token does not match exactly |
| It arrives but you cannot reply | The phone number id is wrong (you used the phone number) |
| It worked for a day and then stopped | You used the 24-hour test token |
8. Publish the app
Publish the app before you serve real customers. Until you publish it, it only works with test numbers, and to publish it Meta asks for a privacy policy URL and an icon.
It is paperwork, and it is required.
Afterwards
- Templates: the only thing you can send outside the 24-hour window.
- Messaging windows: when you can write freely and when you cannot.
- WhatsApp: what Meta watches while you use the number, and what happens if quality drops.